Standardise US States
Standardising state and region names in your CRM ensures data consistency and operational efficiency. With this custom code snippet, you can automatically convert state and region properties to the US State dropdown property. This automation reduces errors, improves reporting, and streamlines territory assignment, especially if your main target is the United States. Implement this solution using a custom code action and code snippet enhancing data accuracy and CRM management.
Use Case
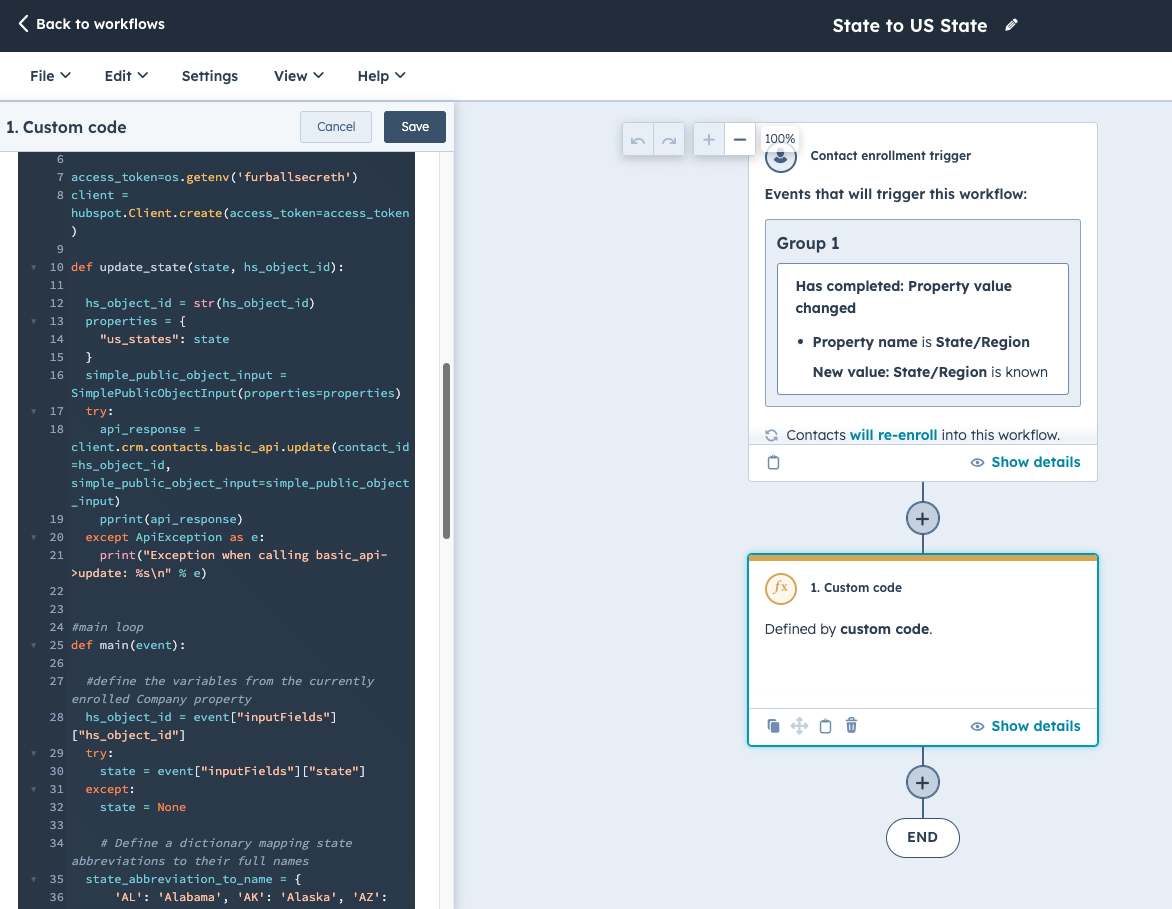
Many companies face challenges with inconsistent state and region entries, leading to errors in reporting and difficulties in territory assignment, associations, and more. To address this need, we developed a solution using a custom code action workflow and a code snippet provided by our implementation team, all implemented entirely within HubSpot without third-party integrations. This approach allows seamless data standardisation based on property values logic.
The implementation process begins by setting up a workflow in HubSpot that triggers the custom code action whenever a contact record contains state or region information. The custom code processes this data to standardize the state or region to match the US State dropdown property. This solution also standardizes cities and postal codes, ensuring comprehensive data accuracy. Specifically, when a contact record in HubSpot contains state/region information, the custom code action triggers and processes the data to match the standardized US State dropdown property. Leverage our expertise in programmable automation to streamline your CRM processes and enhance the accuracy of your customer data.
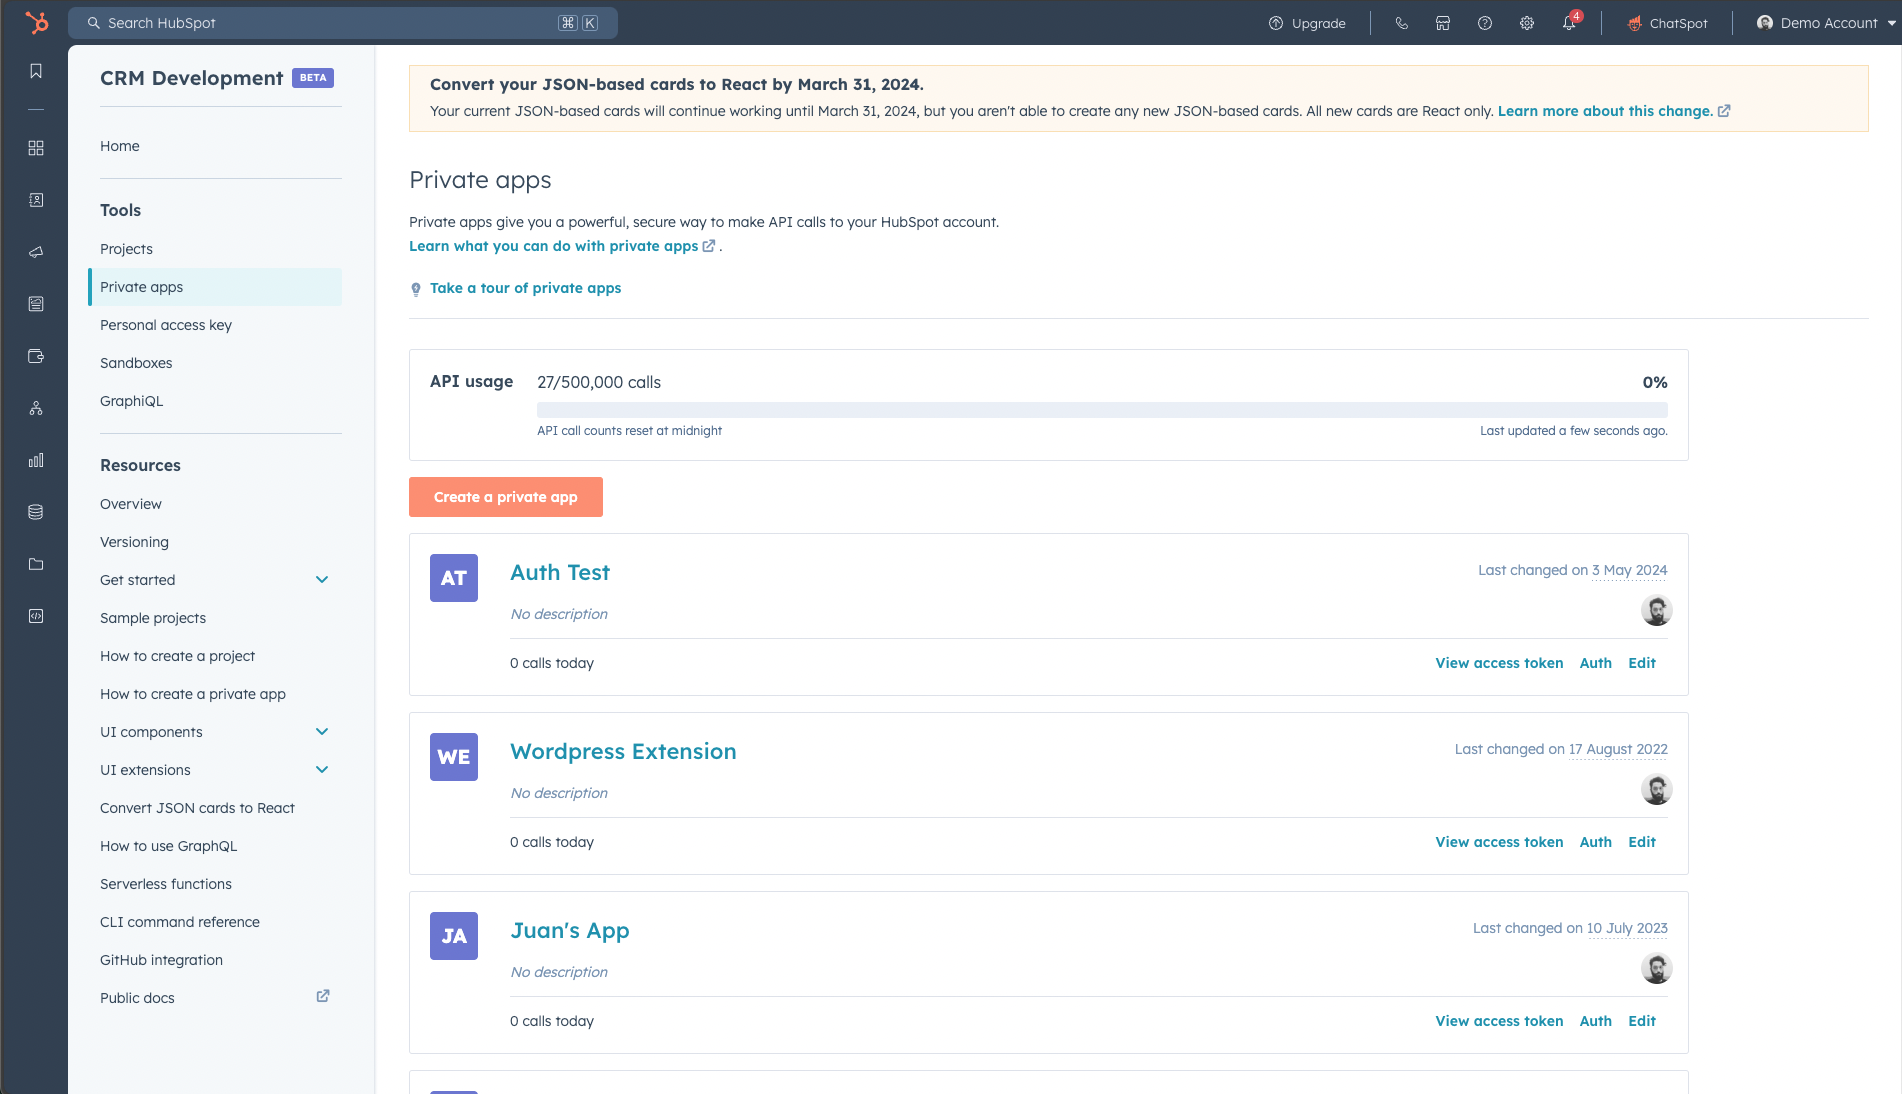
Step 1: Create a Private App
- Navigate to your HubSpot account.
- Click the settings icon in the top navigation bar.
- In the left sidebar menu, select "Integrations" and then "Private Apps".
- Click the "Create a private app" button.
- Enter a name and description for your app.
- Click "Next" to proceed.
Step 2: Select Scopes
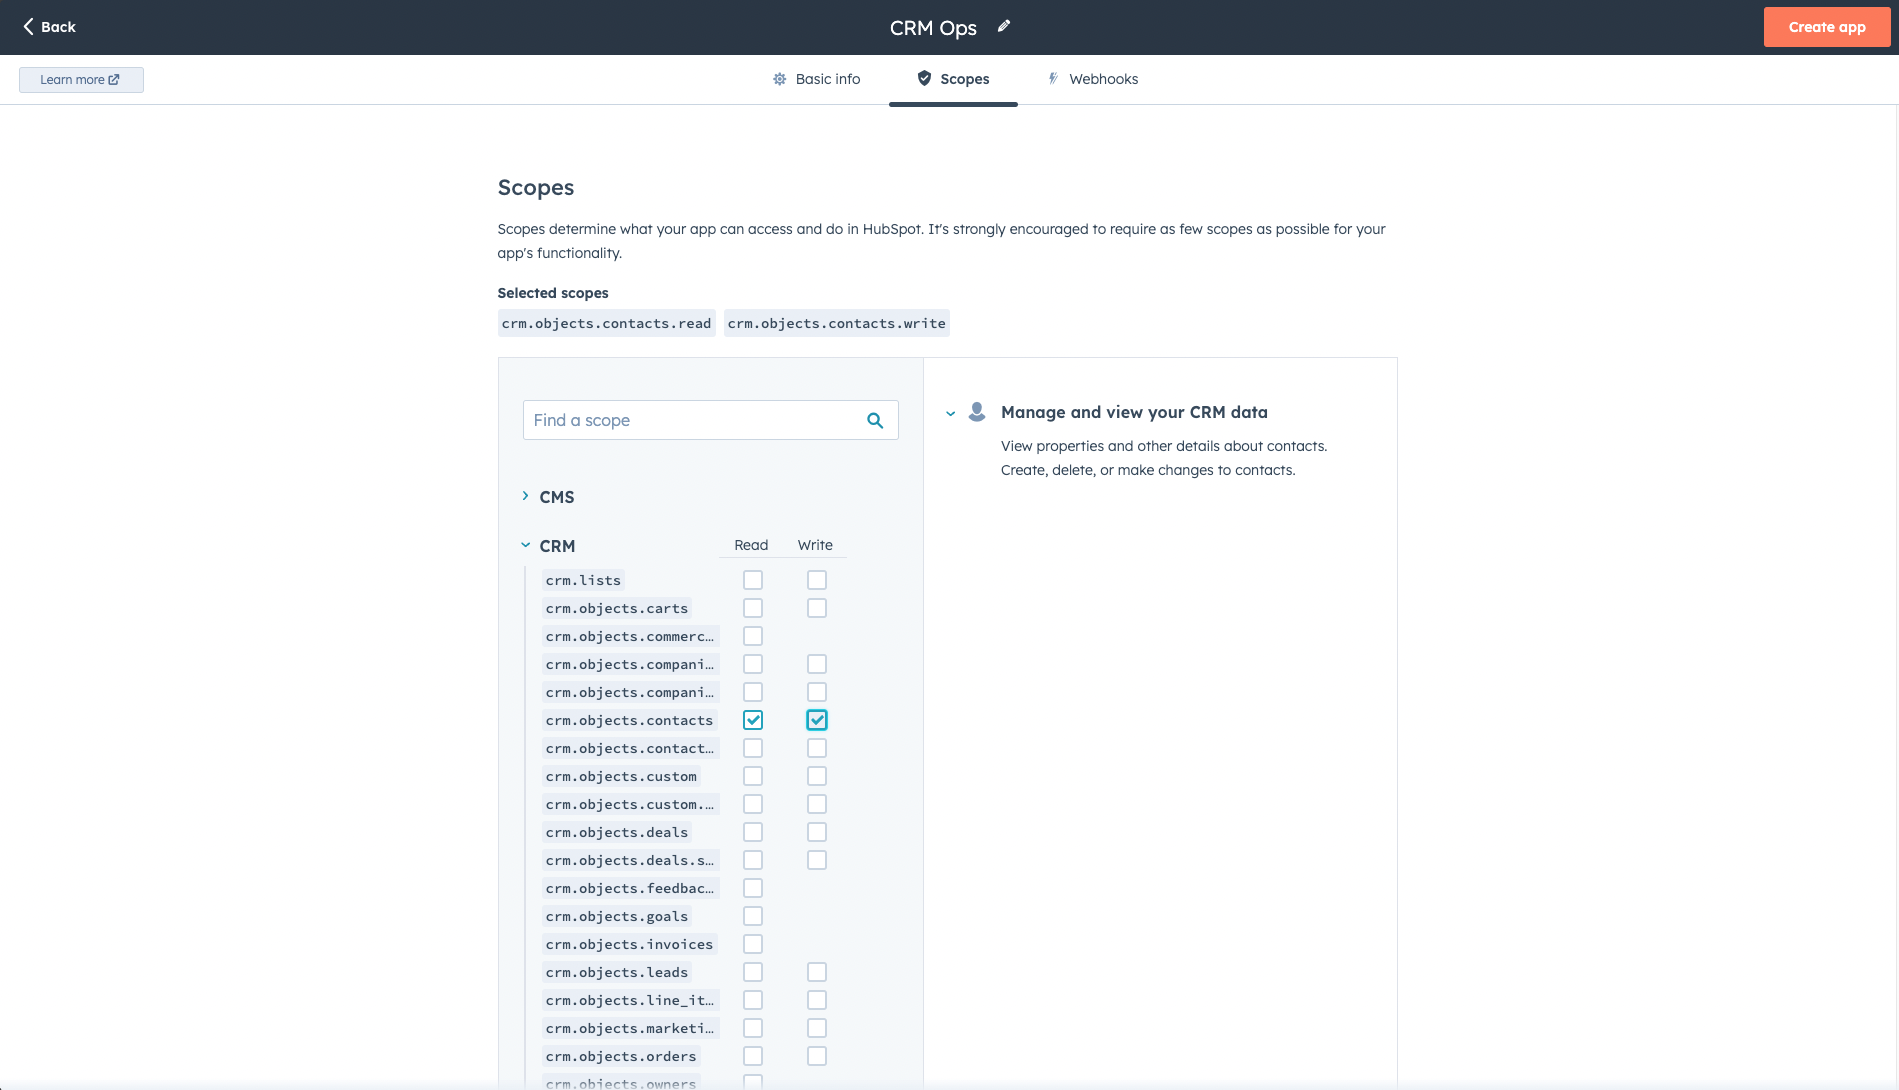
- On the scopes selection page, scroll down to find "crm.objects.contacts".
- Check the box next to "crm.objects.contacts" to grant the app access to contacts data.
- Review and select any additional scopes your app may need.
- Click "Next" to proceed.
Step 3: Copy Your HubSpot Token and Keep It Safe
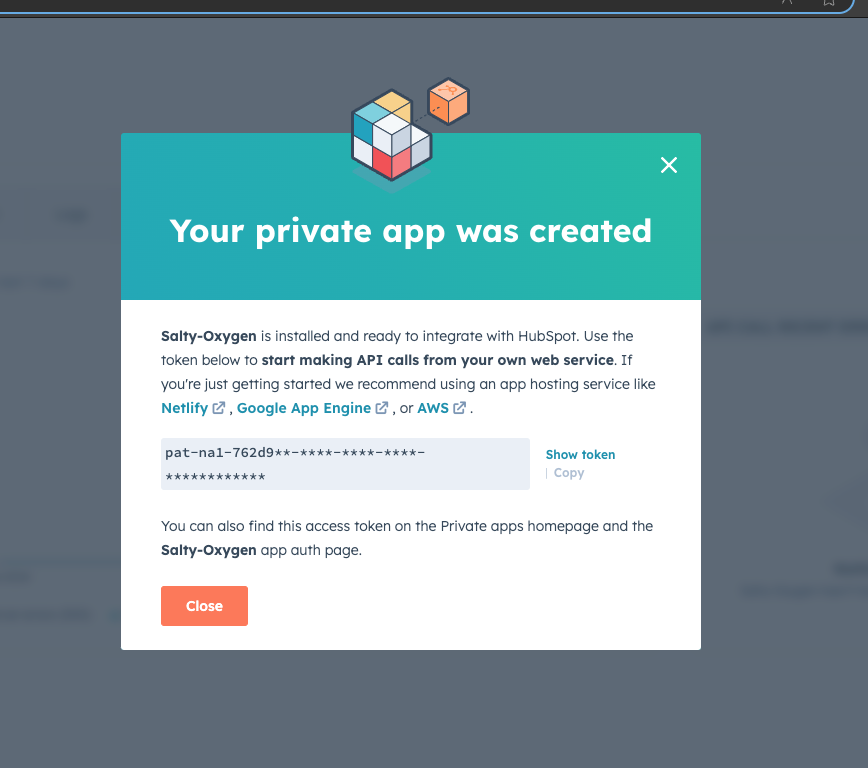
- After selecting the scopes, you will be provided with a token.
- Copy the token and store it in a secure location, as you will not be able to view it again.
- Click "Done" to finalize the creation of the private app.
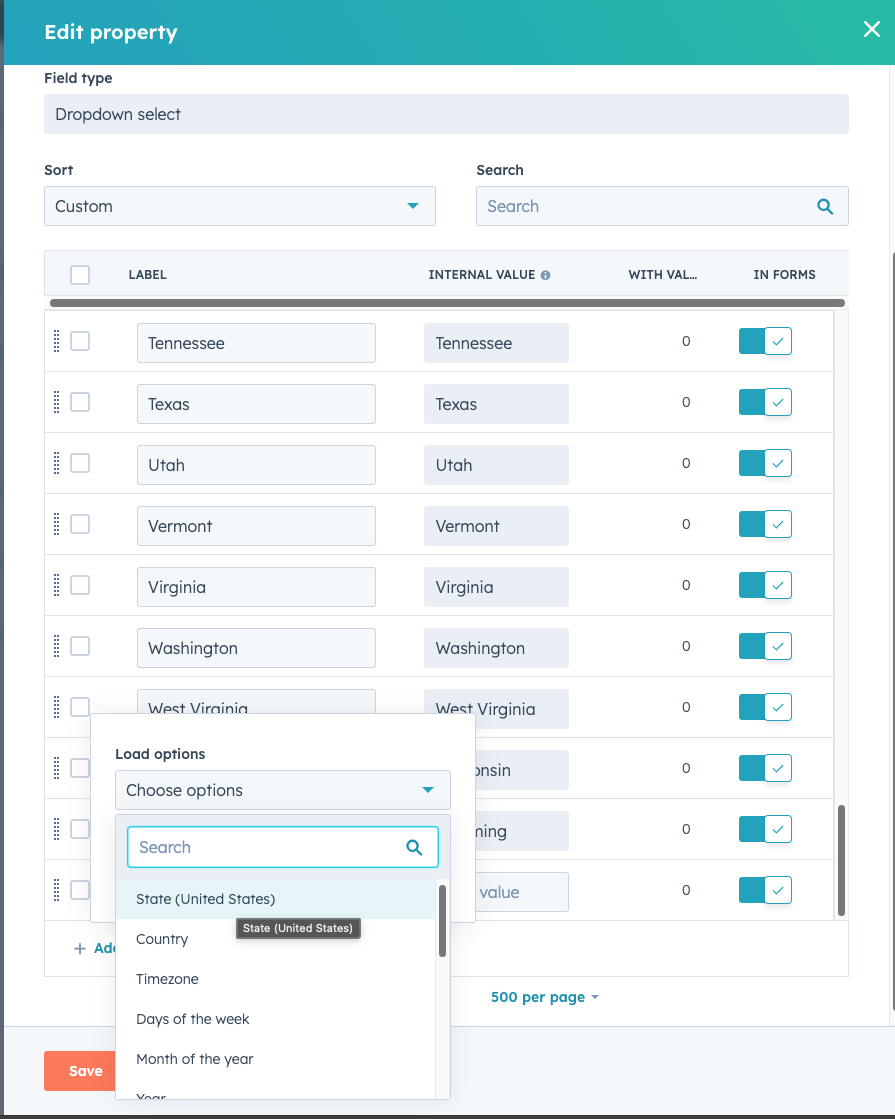
Step 4: Create the US State Property by Loading the US States in the Dropdown Select Options
-
Navigate to Your HubSpot Account:
- Log in to your HubSpot account.
- Click the settings icon in the top navigation bar.
-
Access the Properties Settings:
- In the left sidebar menu, navigate to "Properties".
- In the left sidebar menu, navigate to "Properties".
-
Select the Object for Your Property:
- Click the "Select an object" dropdown menu, then choose "Contact properties" (or the appropriate object for your use case).
- Click the "Select an object" dropdown menu, then choose "Contact properties" (or the appropriate object for your use case).
-
Create a New Property:
- Click the "Create property" button.
- Click the "Create property" button.
-
Configure the Property:
- In the "Basic info" tab, enter a label for your property, such as "US State".
- Set the group for the property, for example, "Contact Information".
-
Set the Field Type:
- Navigate to the "Field type" tab.
- Select "Dropdown select" from the list of field types.
-
Load the US States in the Dropdown Options:
-
Save the Property:
- Once all states have been added, click "Create" at the bottom of the panel to save the new property.
Step 5: Create a Workflow and Set Up the Trigger "State/Region is Known"
-
Navigate to Your HubSpot Account:
- Log in to your HubSpot account.
- In the main navigation bar, go to Automations > Workflows.
-
Create a New Workflow:
- In the upper right corner, click Create workflow.
- Select From scratch.
- Choose contact-based from the left panel.
- Select Blank workflow and then click Next to proceed to the workflow editor.
-
Set Up the Enrollment Trigger:
- In the workflow editor, click Set up triggers.
- In the left panel, under Contact properties, select State/Region.
- In the criteria setup, select is known from the dropdown menu. This will ensure that the workflow enrolls any contact where the State/Region property has a value.
-
Save the Enrollment Trigger:
- After setting up the criteria, click Save in the top right corner of the panel to finalize the trigger setup
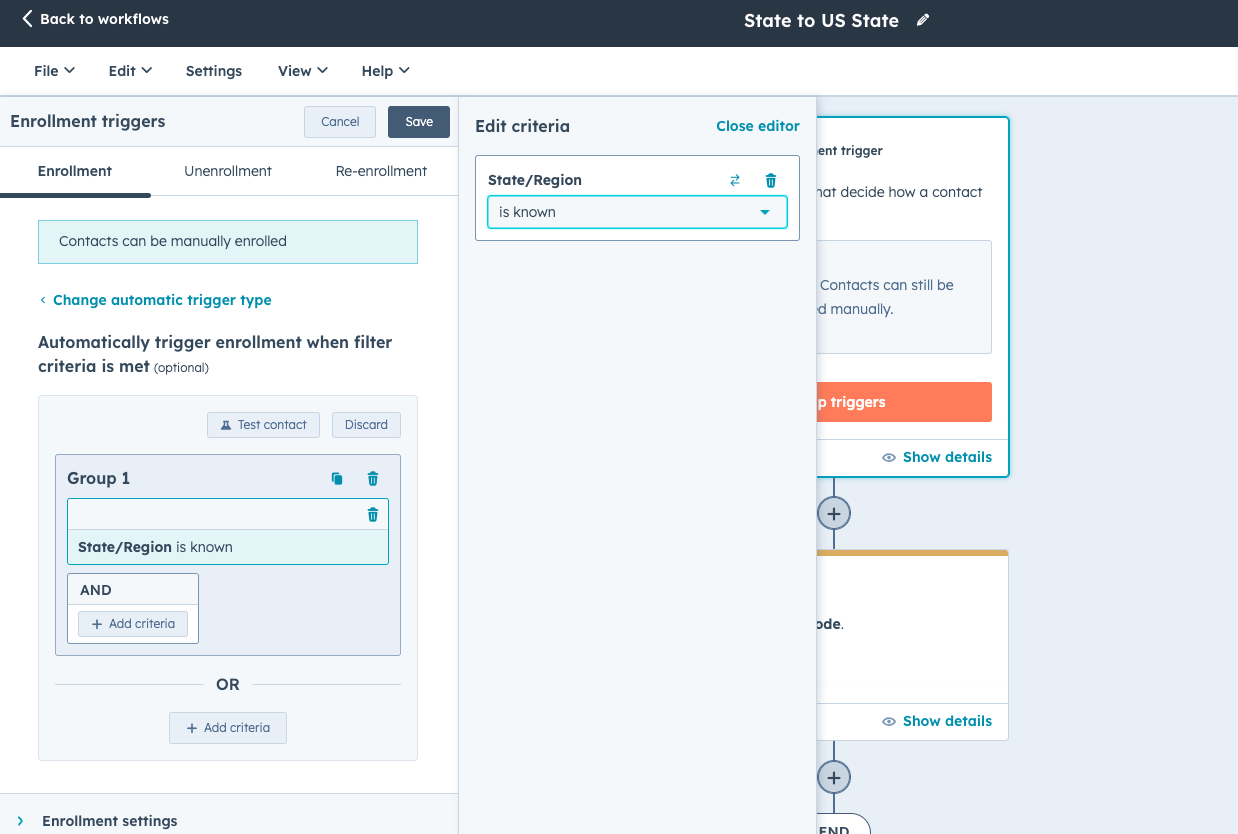
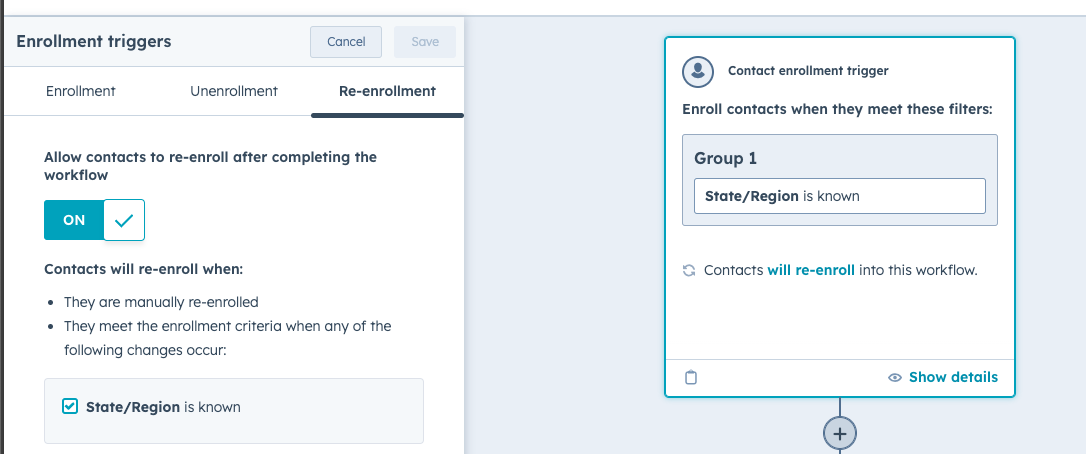
Step 6: Toggle On Re-enrollment When State/Region is Known
-
Set Up the Re-enrollment Trigger:
- Click the Contact enrollment trigger box to open the enrollment trigger settings.
- In the left panel, click the Re-enrollment tab.
-
Enable Re-enrollment:
- Click to toggle the Allow contacts who meet the trigger criteria to re-enroll switch on.
- Click to toggle the Allow contacts who meet the trigger criteria to re-enroll switch on.
-
Configure the Re-enrollment Trigger:
- Under Re-enroll contacts if they meet the trigger criteria and any of the following occurs to, select the checkbox next to State/Region is known.
- This ensures that contacts will be re-enrolled in the workflow whenever their State/Region property gains a value or is updated.
-
Save the Re-enrollment Settings:
- Click Done to save the re-enrollment trigger settings.
- Click Save in the main workflow editor to finalize the changes.
These steps will ensure that your workflow re-enrolls contacts whenever the State/Region property is known or updated, allowing the workflow to handle changes to this property dynamically.
Step 7: Add a Custom Code Action and Select Python
-
Add a Custom Code Action:
- Click the + plus icon to add a new workflow action.
- In the right panel, select Custom code.
-
Configure the Custom Code Action:
- In the right panel, set up your action.
- By default, custom code actions will use Node.js 16.x. To switch to Python, click the Language dropdown menu, then select Python.
-
Enter the Custom Code:
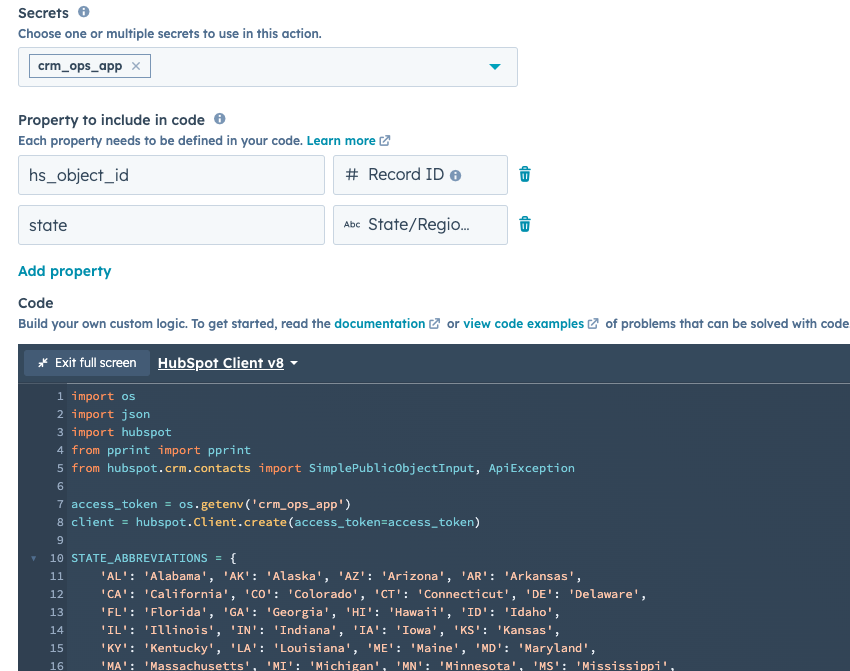
- In the code field, enter your Python code. Below is an example code snippet you might use to standardize US States in contact records:
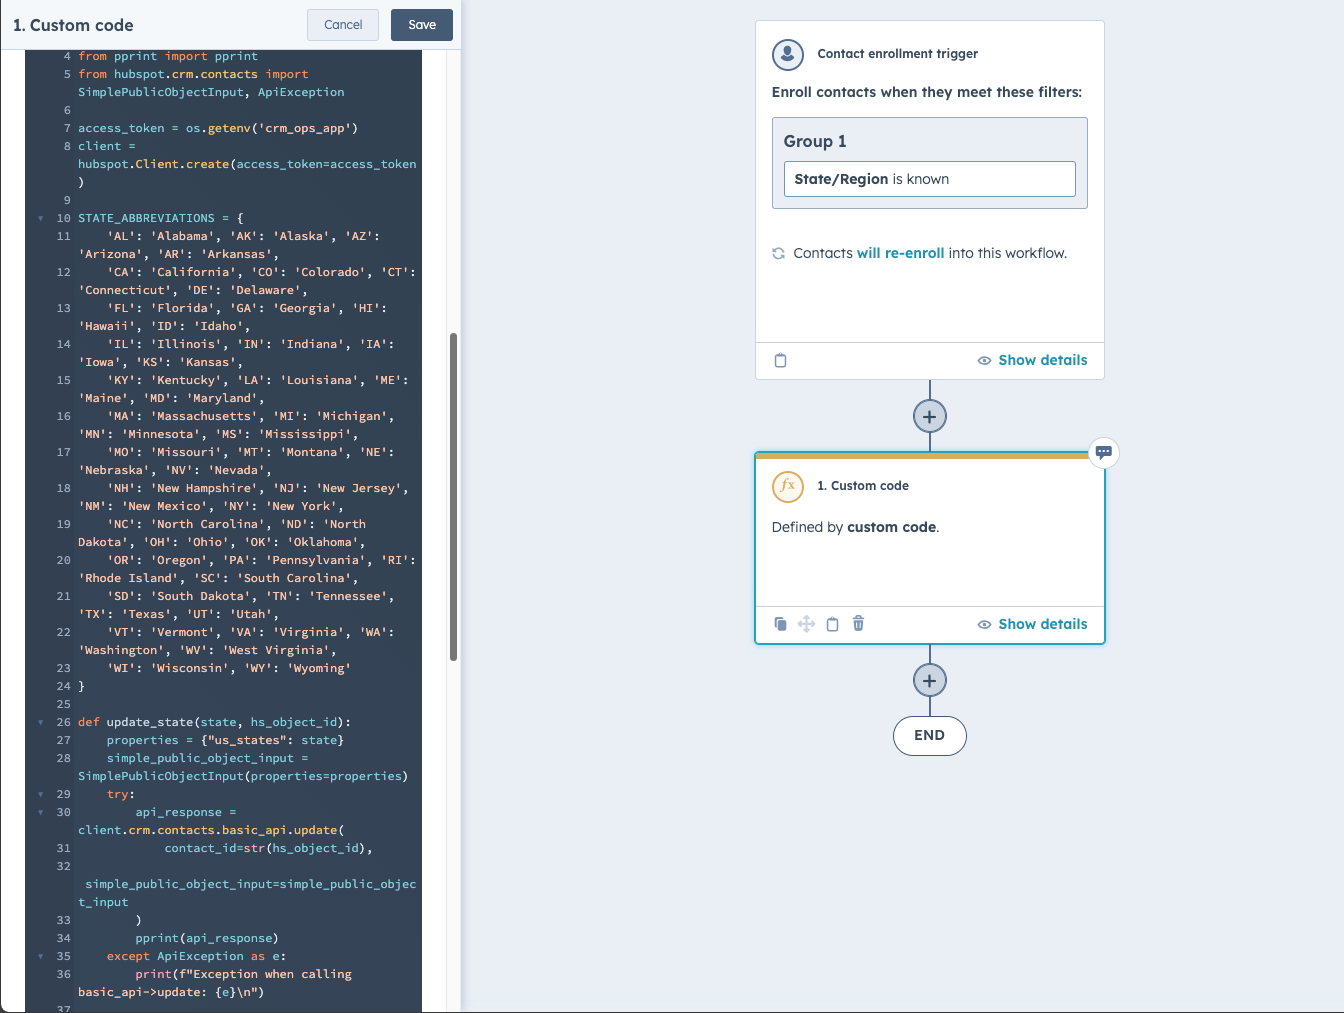

Step 8: Create a Secret
-
Add a New Secret:
- In the custom code action setup panel, click Add secret.
- In the dialog box, enter the Secret name as
crm_ops_app. - Enter the Secret value which is the private app access token or any sensitive information required by your code.
- Click Save.
-
Verify and Use the Secret:
- Ensure that the newly created secret is now listed and can be selected in your custom code actions 1
Step 9: Add Properties to Include in Code: Record ID and State/Region
-
Configure the Custom Code Action:
- In the workflow editor, locate and select the custom code action you previously created.
- In the workflow editor, locate and select the custom code action you previously created.
-
Add Properties to the Custom Code Action:
- Click the Choose property dropdown menu, then select Record ID.
- Click Add property to add another property .
- Select State/Region from the dropdown menu.
-
Save the Properties:
- After adding and naming the properties, click Save to finalize your custom code action setup.
By completing these steps, the properties Record ID and State/Region will be included in your custom code action and can be referenced in your Python code using the names assigned by default.


Step 10: Test the Custom Code Action
-
Select the Custom Code Action:
- In the workflow editor, locate and select the custom code action you previously created.
- In the workflow editor, locate and select the custom code action you previously created.
-
Open the Test Action Panel:
- At the bottom of the right sidebar, click Test action to expand the testing section.
- At the bottom of the right sidebar, click Test action to expand the testing section.
-
Select a Test Record:
- Click the [Object] dropdown menu, then select a contact record that has the State/Region property known.
- Click the [Object] dropdown menu, then select a contact record that has the State/Region property known.
-
Run the Test:
- Click Test to execute the test.
- Confirm in the dialog box that you want to test your code against the selected record by clicking Test again.
-
Review the Test Results:
- Once your code is done running, the sidebar will display the results of your test.
- Once your code is done running, the sidebar will display the results of your test.
- Save your custom code action.
- Review and Publish your workflow
Ready to enhance the data quality of your CRM?
Leverage our Furball AI app integrated with HubSpot to automate demographic data standardisation, like the US States use case shared. Streamline your CRM processes and boost team efficiency. Contact us today for expert assistance and make the most of our programmable automation and Data solutions.
